For a safe and smooth installation, always ensure that two people are working together.
Note: Since wall materials vary, our corner pantries are delivered without screws for the wall brackets.
Please visit a hardware store or a building supply store to get assistance in selecting the correct screws for your specific wall material.
The corner pantry is delivered in three sections. Follow these steps for assembly:
• Attach the wall brackets to the wall using screws of appropriate length, depending on the wall material (screws not included).
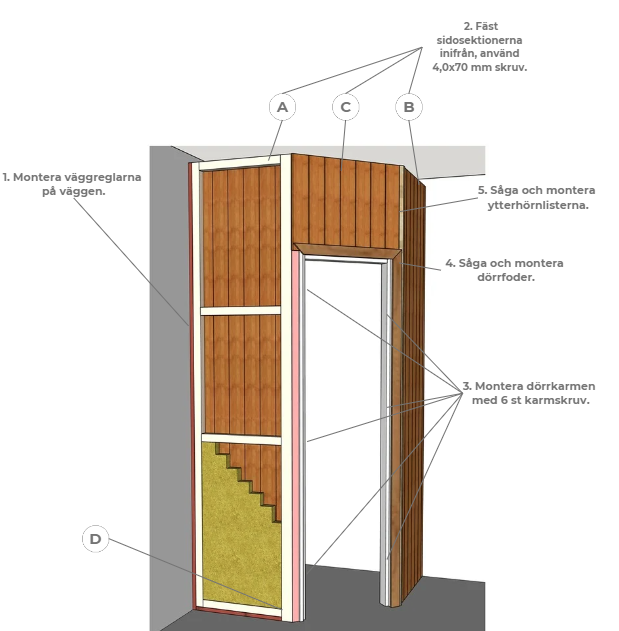
• Secure the side sections (A and B) to the wall brackets by screwing from the inside. Use 5.0×70 mm wood screws.
• We recommend screwing diagonally through the pantry’s brackets (D) to the floor and ceiling for extra stability (screws not included).
• Install the middle section (C) between the side sections (A and B) and secure from the inside using 5.0×70 mm wood screws.
• Drill holes in the door frame for the frame screws and install the frame using the 6 included frame screws. Use a spirit level to ensure the frame is straight.
• Attach the hinges to the door using 3.5×17 mm wood screws (2 screws per hinge). The hinge plates are pre-installed on the frame. Then, mount the door in place.
• Install the door trim (delivered in linear meters). Miter cut the trim and fasten it with finishing nails or a nail gun.
• Attach the external corner trims (delivered in linear meters). Cut the trims to the desired height and secure them with finishing nails or a nail gun.